Introduction
Installing or repairing a bathtub can quickly become confusing once you look behind the walls or under the floor. Drain pipes, overflow tubes, vent stacks, and water supply lines all connect together in a very specific way. If even one component is installed incorrectly, it can lead to leaks, slow drainage, sewer odors, or expensive water damage.
That is why understanding a bathtub plumbing diagram is important for both homeowners and DIY renovators. Whether you are replacing an old tub, planning a bathroom remodel, or simply trying to understand how bathtub plumbing works, knowing the layout can save time, money, and frustration.
It is a system is the network of drain pipes, vent pipes, overflow assemblies, traps, and water supply lines that move clean water into the tub and wastewater safely out of the home. A proper plumbing layout prevents leaks, supports smooth drainage, and protects the home from sewer gas. Understanding these components helps homeowners install, repair, and maintain bathtub systems more confidently.
At Smart Home Fix, we believe homeowners should understand the basics before starting any plumbing project. This guide explains the full bathtub setup in simple language, including components, installation steps, common mistakes, and troubleshooting tips.
Quick Summary
- A plumbing system includes supply lines, drain pipes, overflow pipes, vent pipes, and a P-trap
- The drain and overflow assembly prevents flooding and controls wastewater flow
- Proper venting is essential for smooth drainage
- Incorrect pipe slope or poor sealing often causes leaks and clogs
- DIY installation is possible for basic projects, but complex rerouting may require a licensed plumber
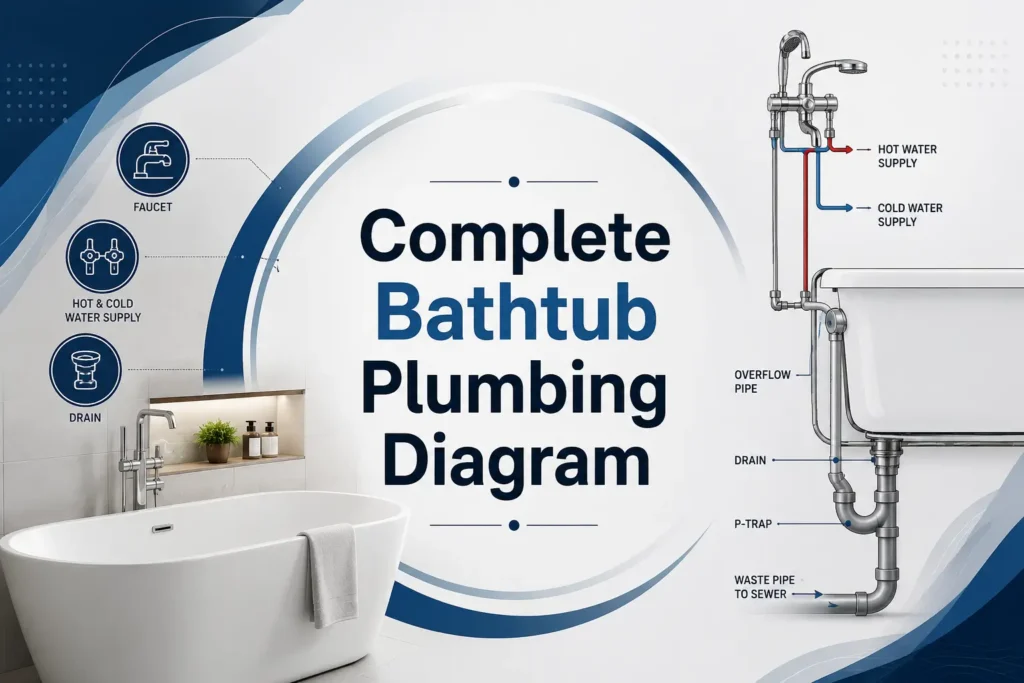
Understanding a Bathtub Plumbing System
A plumbing system has two main jobs:
- Deliver clean hot and cold water into the tub
- Remove dirty water safely through the drain system
Even though the setup may look complicated, most bathtubs follow the same plumbing layout.
The main components include:
- Water supply lines
- Faucet and mixing valve
- Drain opening
- Overflow pipe
- Drain shoe
- P-trap
- Waste pipe
- Vent pipe
Each part works together to keep water flowing correctly and prevent plumbing problems.
Main Parts in a Bathtub Plumbing Diagram
Water Supply Lines
Every bathtub has two water supply pipes:
- Hot water line
- Cold water line
These pipes connect to the faucet or mixing valve behind the wall. In most modern homes, flexible PEX tubing or copper pipes are commonly used.
The mixing valve controls water temperature before it enters the tub spout or showerhead.
For example, in a standard US bathroom remodel, plumbers often install 1/2-inch PEX lines because they are easier to route through walls compared to rigid copper piping.
Bathtub Drain Opening
The drain opening sits at the bottom of the tub and allows wastewater to leave the bathtub.
It connects directly to the drain shoe underneath the tub. A watertight seal is created using plumber’s putty or silicone sealant.
If the drain seal is loose, water can leak below the tub and damage subflooring over time.
Overflow Pipe
The overflow pipe is the upper drain opening located near the top of the bathtub wall.
Its purpose is simple but important: it prevents flooding if someone accidentally leaves the water running.
When the water level rises too high, excess water flows into the overflow opening and down through the drain assembly.
A proper bathtub diagram always includes the overflow connection because it is a required safety feature in most building codes.
Drain Shoe
The drain shoe is the elbow-shaped fitting directly attached beneath the bathtub drain.
It connects the bathtub drain opening to the waste pipe system.
Although small, this component is essential because it creates the transition between the tub and the plumbing network below the floor.
P-Trap
The P-trap is one of the most important parts of the plumbing system.
It is the curved pipe section located beneath the bathtub drain. Its curved shape holds a small amount of water at all times.
This water barrier prevents dangerous sewer gases from entering the home.
Without a properly installed P-trap, bathrooms can develop strong sewer odors very quickly.
Waste Pipe
The waste pipe carries wastewater away from the bathtub and toward the home’s main sewer line.
Most residential bathtub drain systems use 1 1/2-inch drain piping.
The pipe must slope slightly downward to allow gravity drainage.
Too much slope can cause poor flow, while too little slope can lead to standing water and clogs.
Vent Pipe
The vent pipe allows air into the plumbing system.
Without proper venting, water drains slowly and creates gurgling noises.
Vent pipes also help maintain balanced air pressure inside the drain system.
Many homeowners overlook venting when reading a bathtub diagram, but it is one of the biggest factors affecting drainage performance.
How a Bathtub Plumbing Diagram Works
When you turn on the faucet, hot and cold water travel through supply pipes into the tub.
After bathing, wastewater flows through:
- Drain opening
- Drain shoe
- Overflow assembly
- P-trap
- Waste pipe
- Main sewer line
Meanwhile, the vent pipe balances air pressure to keep drainage smooth.
The system relies heavily on gravity and proper pipe alignment.
Even small installation mistakes can affect the entire setup.
Basic Bathtub Plumbing Diagram Layout
A standard bathtub layout usually follows this arrangement:
| Plumbing Component | Main Purpose |
| Water supply lines | Deliver hot and cold water |
| Faucet valve | Controls water flow and temperature |
| Overflow drain | Prevents bathtub flooding |
| Drain shoe | Connects tub drain to waste pipe |
| P-trap | Blocks sewer gases |
| Waste pipe | Removes wastewater |
| Vent pipe | Improves drainage airflow |
This setup is common in most US homes and apartment bathrooms.
Step-by-Step Bathtub Plumbing Installation Guide
Step 1: Turn Off the Water Supply
Before starting any plumbing work, shut off the bathroom water supply.
Open the faucet afterward to release any remaining pressure from the lines.
This prevents accidental flooding during installation.
Step 2: Position the Bathtub
Place the bathtub carefully into the installation area.
Use a level to confirm the tub sits evenly on the floor.
An uneven bathtub can cause drainage problems because water may not flow correctly toward the drain opening.
Some acrylic tubs also require a mortar base for additional support.
Step 3: Install the Drain Assembly
Attach the drain flange to the bathtub drain opening using plumber’s putty or silicone sealant.
Then connect:
- Drain shoe
- Overflow tube
- Overflow gasket
Tighten connections securely without overtightening.
Loose fittings are one of the most common causes of hidden leaks.
Step 4: Connect the P-Trap
Install the P-trap beneath the bathtub drain assembly.
Make sure the curved section aligns properly with the waste pipe.
The trap should remain accessible whenever possible for future cleaning.
Many professional plumbers recommend testing the alignment before permanently securing the pipes.
Step 5: Install the Waste Pipe
Connect the waste pipe to the home’s main drain system.
Maintain the correct downward slope.
In most US plumbing codes, the recommended slope is 1/4 inch per foot.
This helps wastewater flow efficiently without backups.
Step 6: Connect the Vent System
The vent pipe should connect to the drain system according to local building codes.
Improper vent placement can cause:
- Slow drainage
- Gurgling sounds
- Sewer odors
Complex venting configurations may require professional plumbing assistance.
Step 7: Connect Water Supply Lines
Attach hot and cold supply lines to the faucet valve.
Most modern installations use:
- PEX tubing
- Copper piping
- Flexible braided connectors
Check carefully for leaks before closing the wall.
Step 8: Test the Entire System
Fill the bathtub completely and release the drain.
Watch closely for:
- Leaks
- Slow drainage
- Dripping joints
- Overflow problems
Testing before finishing walls or flooring can prevent expensive repairs later.
Common Bathtub Plumbing Problems
Slow Draining Water
Slow drainage usually happens because of:
- Hair buildup
- Soap residue
- Poor venting
- Incorrect pipe slope
A drain snake often solves basic clogs quickly.
Sewer Smells in the Bathroom
Bad odors usually mean:
- Dry P-trap
- Cracked drain pipe
- Venting issue
If a bathtub is rarely used, pouring water into the drain may refill the trap and stop odors.
Water Leaks Under the Tub
Leaks commonly occur around:
- Drain seals
- Overflow gaskets
- Pipe joints
Even a small drip can damage flooring over time.
This is why Smart Home Fix always recommends leak testing before finishing the installation.
Gurgling Sounds
Gurgling usually indicates poor venting.
The plumbing system needs airflow to maintain proper drainage pressure.
Ignoring this issue can eventually lead to drainage backups.
Best Pipe Materials for Bathtub
PVC Pipe
PVC is affordable, lightweight, and easy to install.
It is commonly used for residential drain systems.
Pros:
- Budget-friendly
- Corrosion resistant
- Easy for DIY projects
Cons:
- Can crack under heavy stress
ABS Pipe
ABS piping is strong and durable.
It is often used in colder climates because it handles impact well.
Pros:
- Stronger than PVC
- Easy installation
Cons:
- Not allowed in all local codes
Copper Pipe
Copper is commonly used for water supply lines.
Pros:
- Long-lasting
- Heat resistant
- Reliable
Cons:
- More expensive
- Harder for beginners to install
PEX Tubing
PEX has become extremely popular in modern bathroom remodels.
Pros:
- Flexible
- Easy installation
- Lower labor costs
Cons:
- UV sensitive
DIY vs Hiring a Professional Plumber
DIY Installation
DIY bathtub can work well for:
- Simple drain replacements
- Minor repairs
- Basic remodeling
Pros:
- Saves labor costs
- Good learning experience
Cons:
- Risk of leaks
- Possible code violations
Professional Installation
Licensed plumbers are best for:
- Moving drain locations
- Rerouting vent pipes
- Full bathroom renovations
Pros:
- Code-compliant work
- Faster installation
- Lower long-term risk
Cons:
- Higher upfront cost
For complicated plumbing systems, professional help is usually the safer choice.
Tips for Maintaining Bathtub Plumbing
Clean the Drain Regularly
Hair and soap buildup cause most bathtub clogs.
Using a drain cover can significantly reduce blockages.
Inspect for Leaks
Check beneath the tub periodically for moisture or stains.
Catching leaks early prevents expensive water damage.
Avoid Harsh Chemical Cleaners
Strong chemical drain cleaners can damage pipes over time.
Mechanical drain snakes are usually safer.
Test the Overflow Drain
Pour water near the overflow opening occasionally to ensure it works properly.
Many homeowners never test this feature until an emergency happens.
Final Thoughts
Understanding a bathtub plumbing diagram makes bathroom projects far less intimidating. Once you know how supply lines, drains, vents, and traps work together, troubleshooting and installation become much easier.
Whether you are planning a full remodel or replacing an older bathtub drain system, careful planning and proper installation matter more than rushing the project. A well-installed bathtub plumbing system can last for decades with minimal problems.
At Smart Home Fix, our goal is to make home improvement information practical, simple, and useful for real homeowners. Taking the time to understand your plumbing layout today can help prevent expensive repairs tomorrow.
Frequently Asked Questions
What is the purpose of a bathtub overflow drain?
The overflow drain prevents water from spilling over the edge of the tub if the water level gets too high. It redirects excess water into the drain system safely. This feature is especially important in homes with children or busy bathrooms where tubs may accidentally be left running.
Can I install bathtub plumbing myself?
Yes, basic bathtub plumbing projects can be DIY-friendly if the existing pipe layout stays the same. However, moving drains or vent lines often requires professional experience. Incorrect installation may lead to leaks, drainage problems, or failed plumbing inspections.
Why does my bathtub drain slowly?
A slow bathtub drain is usually caused by hair buildup, soap residue, or poor venting. Small clogs inside the P-trap are also common. Regular cleaning and proper venting maintenance help improve drainage speed.
What pipe size is used for bathtub drains?
Most residential bathtub drains use 1 1/2-inch pipes. Some local plumbing codes may require larger pipe sizes depending on the system layout. Always check local code requirements before starting installation work.
How do I stop sewer smells from my bathtub drain?
Sewer odors often happen when the P-trap dries out or the vent system has problems. Pouring water into an unused drain may restore the water seal. Persistent odors usually require a plumbing inspection to identify hidden issues.
Is PVC or PEX better for bathtub plumbing?
PVC is commonly used for drain systems, while PEX is mainly used for water supply lines. Both materials work well when installed correctly. Choosing the right material depends on the plumbing section being installed.